Forever ago, I bought a Groupon for one of those picture on canvases. I had always wanted to print one of my photos this way and when I saw it for $39 (and already had $20 in Groupon bucks because of referrals) I figured I should buy it. I had no idea what I would use it for at the time, but since I had about 6 months until it expired, I thought I would figure it out eventually.
Fast forward to the middle of November…I saw that my Groupon was ready to expire on December 1st! Uh oh! The face value of all Groupons never expire, so I wouldn’t lose the $39, but considering that this Groupon was a $125 value, I really wanted to take advantage of it! Dane and I quickly brainstormed about what the picture should be. We went through both of our hard drives looking for photos from past vacations, photos from California we loved, sunset photos, etc…and came up with nothing that we really wanted to hang on our wall. We also wanted to choose a photo with a high enough resolution since this sucker was going to be blown up to 16 x 20! So that limited our selection down considerably to a time when we actually owned digital cameras with high enough megapixels.
We decided that what we really wanted was a picture of something that reminded us of our time in Manhattan Beach, CA where we lived before moving to Ohio. Luckily, I already had a trip out to California planned just before the groupon’s expiration date…yipee! So, one day that I was there, my Dad and I started at the most northern spot in Manhattan Beach and I started taking pictures.
 That was one of the first pictures I took of the bike path that Dane and I loved so much. Ummm, ya…it was so freaking hazy out! Of course! The one day I need it to be a beautiful day for picture taking, it was all hazy and yucky. I was gettin’ a lil stressed with that December 1st deadline nudging me!
I turned around to take a picture to the north…womp, womp… It looked clearer that way, but who wants orange cones adorning their walls? Not me, that’s who.
 We got back in the car and drove to the Manhattan Beach Pier where I snapped another few (hundred) pictures…ok, not really, but in all I think I snapped 100 pictures trying to get the right one…thank God for digital!
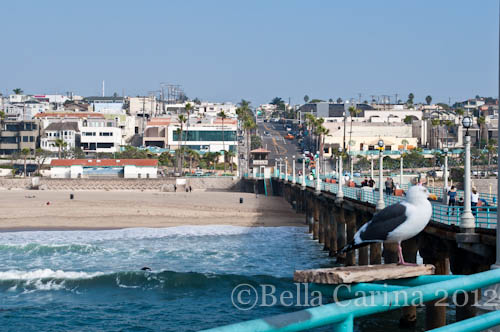 Although this one ended up being a contender (we loved the seagull and the shot up Manhattan Beach Blvd), but it just wasn’t exactly what we had had in mind.
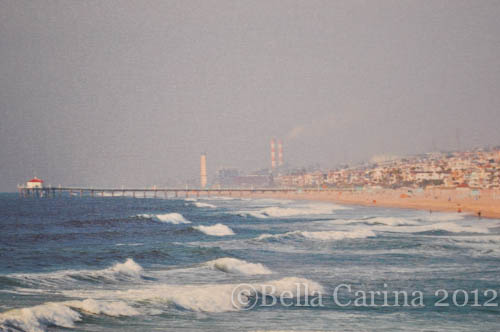
We got back in the car and headed to Hermosa Beach Pier where I was able to take photos to the north…and got the shot that made it. We loved how the iconic Manhattan Beach Pier (the red roof on the round building at the end) and the candy cane smoke stacks could be seen. It reminded us of home.
Now, I’m not gonna lie, the Southern California version of the Pacific Ocean is not that blue…there may have been some adjustment in the color levels to try and offset the haziness of the day, but we liked it…no, we loved it. The waves, the lifeguard towers, the different colored homes, the random people strolling on the beach with the occasional surfer coming out of the water…it was perfect.
 Happy with our decision, I went to the Groupon website and it connected me to www.pictureitoncanvas.com where I easily uploaded my image (it’s best if it’s a jpeg and the file size has to be at least 1 MB and less than 10 MB) and followed the steps. I didn’t do any of the add-ons such as “colorizing” (if the image was black and white and you wanted it color) or changing it to a sepia tone which cost extra. They state that they automatically change the colors as they see fit. I was a little disappointed by this because I liked the way I had changed the colors, but I could see how this would be really good for someone that doesn’t own photo editing software.
So, after waiting 3 very long weeks…the canvas finally arrived. It actually got delivered to our porch the day after both Dane and I had left for our week long trips home for Christmas. Bummer. I was slightly stressed that it was going to be destroyed by the time we got home, but to my surprise, it was already hanging on our bedroom wall when Dane brought me home from the airport and it was in mint condition. Hurray!
 The colors had been changed slightly, but I liked it. It looked much more natural than my original photo had looked. It actually had the look of a painting too, which I wasn’t expecting, but I liked as well.
 We loved the tiny details of the people on the shore…and the texture of the canvas…
 and how they had magically faded out the power lines along the top of the hill, which are a little less than beautiful.
 Overall, we are very happy with it. And it was awesome that shipping was included, so it really was only $19 (after those 20 Groupon bucks were taken off). Oh, and it’s the 1.5 inch gallery wrapped canvas in case you’re wondering, which is why it seems like the canvas is zoomed in compared to the original photo. The rest of the photo is actually wrapped around the edges.
I don’t know if I would’ve been as happy with it if I had spent $125 for it, but if you can find a Groupon (which I’ve had only good experiences with so far) then I would go for it.
I’d be interested to see what a photo of people would have turned out like since this one seemed so much like a painting to me. Has anyone else used this company for a photo with people? I’ve also been eyeing Costco’s service for this as well…anyone tried them?
***I wasn’t compensated in any way by Groupon or www.pictureitoncanvas.com… just wanted to share my opinion. 😉
PS: Happy Birthday to my awesome, Dad! 


